Find even more cool flyer templates for summer events on GraphicRiver, to ensure your next event draws in the crowds.
Ready for summer? Fantastic, let’s go...
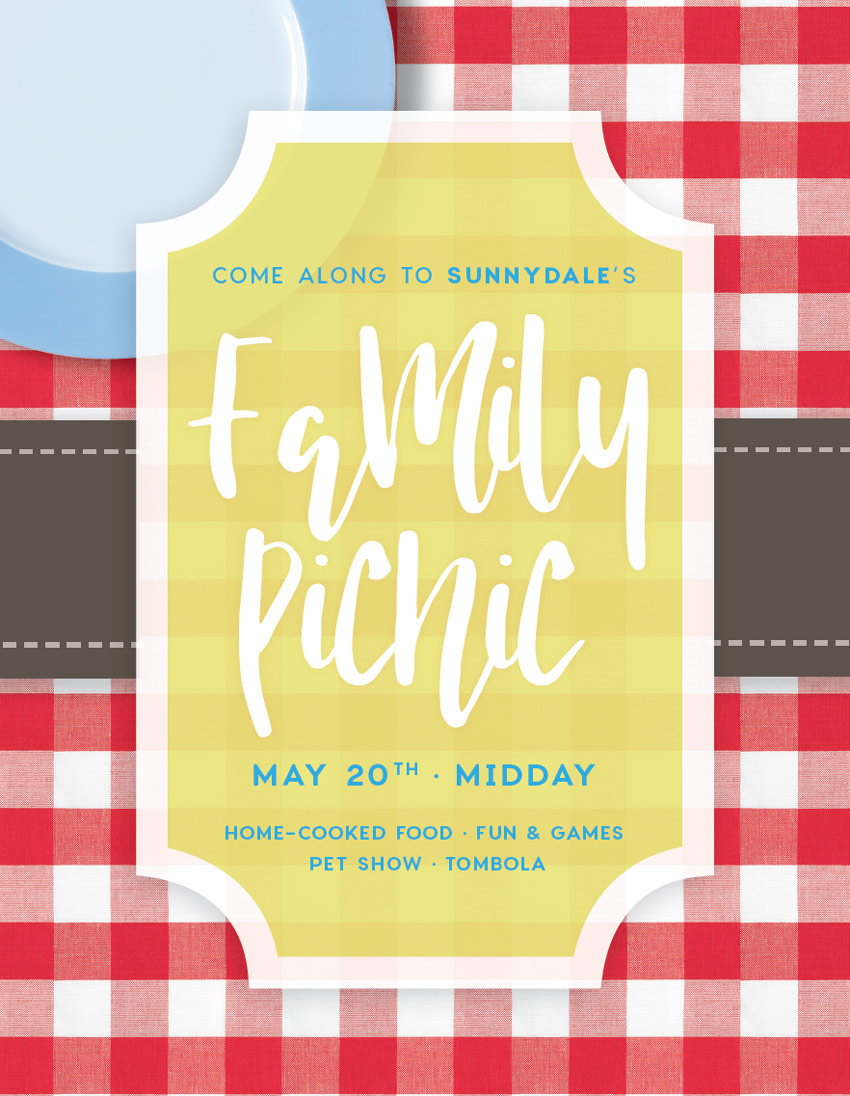
What You’ll Need to Create Your Flyer
You’ll need access to Adobe InDesign to put together your flyer design. If you don’t have an InDesign subscription, that’s no problem—you can download a 30-day free trial of the software from Adobe.If you’d like to add optional items to your tablecloth, like the plate shown here, you will also need to have access to Adobe Photoshop, for removing the backgrounds of your images. This is a completely optional step, so you can still create the flyer without adding objects to your tablecloth.
You’ll also need to download the following images and fonts:
- Gingham tablecloth
- Charlevoix Medium
- Charlevoix Semibold
- Nicoline hand-lettered font
- (Optional) Plate with blue rim
1. How to Set Up a Flyer Document in InDesign
We’ll be setting up the flyer to a standard size, 8.5 by 11 inches. If you want to design to a different size you can either tweak the proportions of elements as we go, or export the final design as an image and scale it up or down.Step 1
Open InDesign and go to File > New > Document. Keep the Intent set to Print, Number of Pages to 1, and uncheck Facing Pages.Under Page Size, choose Flyer 8.5x11 from the list of presaved sizes, or type in 8.5 in (or 215.9 mm) for the Width and 11 in (or 279.4 mm) for the Height.

Step 2
Set the Top and Bottom Margins to 26 mm and the Left and Right Margins to 33 mm.Add a Bleed of 5 mm to all edges of the page if you’re intending to send the flyer to print; if not, you can leave the bleed set to 0. Then head up and click OK.

2. Lay Out Your Picnic Cloth Background
Step 1
Expand the Layers panel (Window > Layers) and double-click on the default Layer 1 name in the layers list.Rename the layer Tablecloth and click OK.

Step 2
Take the Rectangle Frame Tool (F) from the Tools panel and drag across the page, extending the frame up to the edge of the bleed on all sides.Go to File > Place, navigate to your tablecloth image, and click Open. Double-click inside the image frame to directly select the image. Hold down Shift and drag to enlarge the image, until the checks are large and generous.

3. How to Create a Border on Your Layout
Step 1
Expand the Swatches panel (Window > Color > Swatches) and click on the New Swatch button at the bottom of the panel.Name the swatch Lemon, and set the Type to Process and Mode to CMYK. Set the percentage levels to C=7 M=1 Y=68 K=3, click Add, and then click OK to exit the window.

Step 2
Return to the Layers panel and lock the Tablecloth layer. Click on the Create New Layer button at the bottom of the panel, and rename this new layer Border.
From the Swatches panel, set the Fill of the shape to your new Lemon swatch, and the Stroke of the rectangle to [Paper] (white).

Step 3
Expand the Stroke panel (Window > Stroke) and increase the Weight of the shape’s stroke to 23 pt. From the Align Stroke options, choose the central option, Align Stroke to Inside.

Step 4
With the rectangle selected, go to Object > Effects > Transparency. Decrease the Opacity to around 93% to bring through some of the gingham pattern below.


4. How to Format Typography on Your Flyer
Step 1
Back in the Layers panel, lock the Border layer and create a new layer above, calling it Typography.
From either the Character panel (Window > Type & Tables > Character) or the Character Formatting Controls panel running along the top of the workspace, adjust the Font to Nicoline, Size 160 pt, and Align Center.
From the Swatches panel, adjust the Font Color to [Paper].

Step 2
Select the text frame and Edit > Copy, Edit > Paste it, moving it below the original text frame. Adjust the text to read the second part of your event title, here ‘Picnic’.


Step 3
Create a new CMYK color swatch from the Swatches panel, naming it Sky and setting the levels to C=70 M=14 Y=0 K=0.
Set the Font to Charlevoix Pro Medium, Size 16.5 pt, Tracking 90 and Align Center. You might want to pull out a key detail like the place in Charlevoix Pro Semibold.

Step 4
Select the text frame and Edit > Copy, Edit > Paste. Drag it down to the bottom of the border, and adjust the text to read the date and time of the event. Increase the Font Size to 22 pt, and set the Weight to Semibold.From the Glyphs panel (Window > Type & Tables > Glyphs) you can insert a bullet to separate the information by double-clicking on the glyph in the panel.

Step 5
Edit > Paste the text frame again, moving it below the date and time frame. Adjust the text to list some of the things people can expect on the day. You could also put info about ticket pricing and release dates.Bring the Font Size down to around 14 pt.

5. How to Add a Ribbon to Your Flyer
Step 1
Head back to the Swatches panel and create a new CMYK swatch. Name it Brown and set the levels to C=79 M=78 Y=81 K=0.
Create a small rectangle using the Rectangle Tool (M) which bridges the gap between the left edge of the yellow border and the edge of the bleed on the left side of the page.

Step 2
Select the brown shape and head up to Object > Effects > Drop Shadow. Add a Multiply shadow, adjusting the Opacity and other options until you’ve created a subtle wash of shadow beneath the ribbon.


Step 3
With your mouse, select the brown shape and both dashed lines, before Right-Clicking > Group.

6. Add Optional Objects to Your Tablecloth
This is a completely optional step of the tutorial. If you’d like to add items like plates, cutlery or anything else to the top of your tablecloth, you will need access to Photoshop and a selection of photos of items with a white background.Step 1
Open the plate with a blue rim image in Photoshop.Select the Elliptical Marquee Tool from the Tools panel and, holding Shift, drag to create a perfect circle on the page, matching the dimensions of the plate as best you can. Use the arrow keys to shuffle the position of the marquee.


Step 2
As well as removing the background of your photo, you can also adjust the color levels to better suit the scheme used on your flyer design.Add a new Color Balance Adjustment layer from the bottom of the Layers panel. Here I’ve tweaked the Cyan and Blue sliders to give the plate a more vivid sky blue hue.

Step 3
Return to your InDesign flyer document and create a new layer (here called Plates) above the Ribbon layer and below the Border layer.
You can also add a shadow for more realism by going to Object > Effects > Drop Shadow.


7. How to Export Your Flyer for Printing
Step 1
First up, File > Save your flyer artwork.Then head back to the File menu and choose Export. From the Format drop-down menu in the window that opens, choose Adobe PDF (Print), and click Save.
In the Export window that opens, choose Press Quality from the Preset menu at the top of the window. Check the box that reads View PDF after Exporting.

Step 2
Click on Marks and Bleeds in the window’s left-hand menu. Check All Printer’s Marks and Use Document Bleed Settings.

Conclusion: Your Finished Flyer
Congratulations, your flyer is finished and is ready for circulating. You've picked up lots of great techniques for creating layouts for print in InDesign, so let's recap a few of the main skills you can take forward to other projects. You now know how to:- Create a standard flyer layout using Adobe InDesign.
- Build up a photographic background and colorful border to create a layered, 3D effect.
- Create your own basic graphics, such as ribbon shapes, directly in InDesign.
- Format typography to a professional standard.
- Edit and place images into your layout to create an on-trend flat-lay look.
- Export your completed artwork as a print-ready PDF.

Advertisement
Thank's and support to tutsplus.com
visit website design.tutsplus.com