Dolls are just plain ole creepy. And possessed dolls always have a way of causing infinite destruction. Inspired by the movie Annabelle, let's create some creepy fan art to celebrate Horror Movie Week here on Envato Tuts+.
Learn how to create this portrait from start to finish using the Brush Tool, Adjustments Layers, and resources from Envato Market.
The Story
The story of Annabelle starts innocently with a couple who are expecting their first child. After the husband surprises his wife with a rare doll, soon the couple experience a frightening incident involving a murder of their neighbors. When one of the murderers dies while holding the woman's doll, her spirit possesses the doll, and chaos ensues.And that's where the terror begins...
Details to Consider
Before you begin any fan art, you should always get familiar with the character you're going to paint. Even if you do your own spin and change up the style, there are a few details you'll need to create to connect that fan art to your audience.Here are some facts about Annabelle I'll keep handy for this painting:
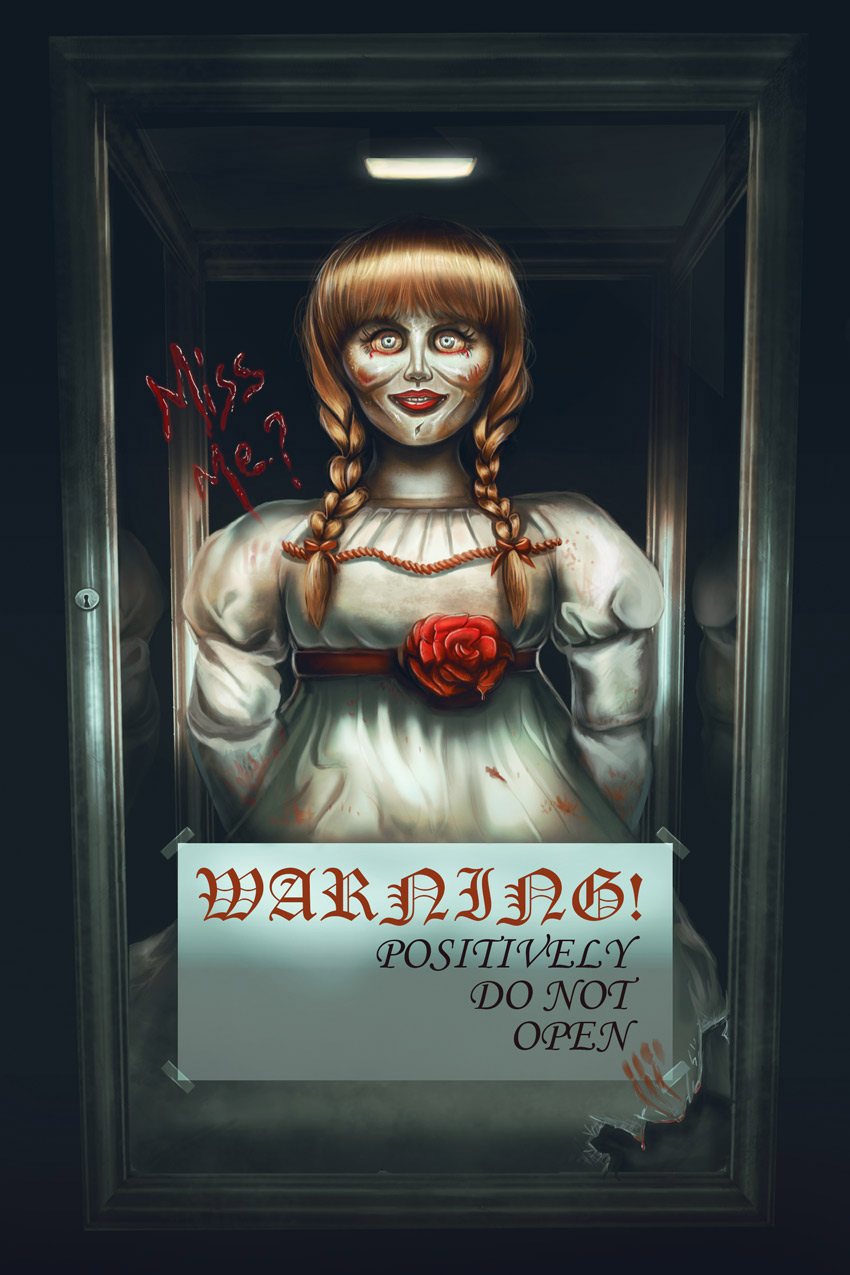
- Annabelle is a tall vintage doll.
- She has reddish hair in braided pigtails and a blunt bang.
- She has wide eyes, a menacing stare, and her mouth can be either opened or closed.
- She was placed into a locked glass box to protect the world from her.
1. Create the Glass Box
Step 1
When we first discover Annabelle, she's locked in a glass box stored in the basement of demonologists Ed and Lorraine Warren. Honestly, I wasn't looking forward to painting this box at all. So instead, I decided to use this Frame Stock from Envato Market to help me create the glass box.Create a New Document at 1771 x 2656 pixels and 150 dpi. Feel free to increase the resolution if you'd like. Copy and paste your stock reference into Photoshop and use the Magic Wand Tool (W) to select and then Delete all the white parts of the stock. Then use the Rectangular Marquee Tool (M) to select the inside of the frame and Delete it as well.

Step 2
Hold Control-J to create a Duplicate of your frame. Resize the copy with Free Transform Tool (Control-T) and place the smaller duplicate in the middle to start building a frame for the box.
Once you're finished creating the box, Merge all the pieces together. If it's still looking a little too perfect, Control-T to Free Transform and select the Perspective option to adjust the perspective to your desires. This might take a lot of experimentation, so just be patient until it works out.

Step 3
Just so we're not distracted by the bright purple color, quickly adjust it by going to Image > Adjustments > Hue and Saturation, adjusting the Saturation to -100. Here is the final frame for our glass box.
2. Sketch Annabelle
Step 1
On a New Layer, start drawing a rough sketch of Annabelle using a Hard Round Brush. As you draw, keep in mind the position of her body in relation to her being inside the box.
Step 2
Lower the Opacity of your initial sketch. Create another New Layer and trace over your first drawing, using this layer as a means to clean up the lines and figure out the remaining details. Try to include bits and pieces from the actual movie.An important aspect of the original box is its large warning sign and the light that helps to illuminate Annabelle. Include these details to make sure you keep in line with the film. For an added twist to the story, you'll see I quickly drew a cracked piece of glass at the bottom of the box. Here is the final sketch.

3. Paint the Gray Base
Step 1
If you're not sure about the color scheme, one great way to start painting is to paint a base in grayscale first. Many digital artists use this method to help establish the lighting scheme before adding color.Use the Paint Bucket Tool (G) to change the background color to a medium gray tone
#454545. Create a selection with the Polygonal Lasso Tool (L) and Fill the top of the box with a dark gray color as well #353535. 
Step 2
To start setting the mood, set a New Layer to Multiply and use the Gradient Tool (G) to create two gray Linear Gradients: one moving downward from the top and the other moving upward from the bottom.
#b4b4b4 using a Hard Round Brush at 100% Hardness. Set the Layer Blend Mode of the sketch to Overlay and Right-click to set it as a Clipping Mask. 
Step 3
For each round of shading, Right-click to set a New Layer as a Clipping Mask to the gray base. Set the first layer to Multiply and begin painting shadows on the doll with the Brush Tool (B). Try to push the shading as far as you can so that you don't have as much to make up for during the coloring process.

Now let's move on to color.
4. Add Color With Layer Blend Modes
Step 1
Merge the layers together for the doll only. Create a New Layer set as a Clipping Mask to the doll. Set the Blend Mode to Multiply and pick some base colors for Annabelle. The main colors I'll be using are yellow#b58562, red #b40909, and cream #bba08e.
Step 2
Brighten up the scene a little by clipping a New Layer to the base and setting it to Color Dodge. Use a light tan color#96908d to paint highlights on the face, dress, and hair with a Soft Round Brush. 
Step 3
Just like before, we want to make sure we're keeping the frame to the glass box in line with the rest of the lighting scheme. Clip New Layers to the frame and background layers. Fill a New Layer with a deep yellow color#8c611d and set it to Color Burn to darken the background.Now move on to the frame. Set the first one to Multiply and paint dark shadow along the frame for that eerie touch. Incorporate texture brushes to make it look more antique. Then Fill a New Layer with brown
#6d5241 and set it to Soft Light to color the frame. 
Step 4
Before we move on to creating more realism for this painting, don't forget one major detail. Create the paper for the warning sign using the Rectangular Marquee Tool (M). Create a quick selection and fill it with a tan color#877266. Right-click to go to Blending Options and set a quick Gradient Overlay with the following settings: 
5. Create Mood With Adjustment Layers
Step 1
So far, the colors of this painting are dull because they were applied to a gray base. Now we'll have to bump up the colors using Layer Blend Modes and Adjustment Layers. Set a New Layer to Color Dodge. Pick a dark orange color#6a3926 and use it to illuminate the scene with a Soft Round Brush. 
Step 2
Make sure you're painting in between your color adjustments. Incorporate texture with a Chalk Brush to make her dress and face more grungy.
Step 3
You'll need to play around with the colors a bit to get them just right. Do this by incorporating Adjustment Layers into your painting. First, I'll be using Gradient Map and Color Lookup with the following settings to tone down the warm colors.

6. Refine Your Painting
Step 1
It can be a little frustrating to stay at it with the color tweaking process because the possibilities are endless in Photoshop. Just keep at it until you're satisfied with the result. Now that the colors are more in line with what I imagined, I can get back to painting more details on the doll's face, hair, and clothes.Use a Hard Round Brush to paint the face and hair. Use tiny strokes for the hair strands and add more texture to the face by keeping the makeup messy. Incorporate gore with a mixture of dripping blood and splattered blood all over her clothes.

Step 2
Take a quick break from the doll to work on the warning sign. Add text with font types similar to the ones used in movie. Here I'll be using a combination of the Old English Text MT and Monotype Corsiva fonts for the top and bottom words. For more personality to your piece, don't forget to include little details like tape, highlights to the broken glass, and smeared blood.
Step 3
Tweak the colors a little further before finishing this piece. Add New Adjustment Layers of Color Balance and Color Lookup to finalize the color scheme with the following settings:

Step 4
In the movie, Annabelle leaves creepy notes with the phrase, "Miss Me," written on them. So let's up the ante on the creepiness level and leave a note smeared in blood. Draw the text yourself using the Brush Tool (B). Right-click to go to Blending Options and add a quick red Outer Glow. Then make the blood shine by painting bright white highlights.
Step 5
Continue to refine your painting. Make sure there's a balance between an innocent doll and a menacing demon waiting to be unleashed on its prey. Copy both sides of the doll's body to create reflections on the left and right glass panels. Continue to push the realistic details of the box by painting shine and a small lock.Add white rim lighting to the doll with white highlights and continue to crisp up the details with a Hard Round Brush set at 100% Hardness. Below is the final painting.

Conclusion
I might not go to sleep after painting this, but fan art is one of the best ways to practice and hone your digital painting skills. Because the concept and colors are already established, all you have to do is paint it in your own personal style. Incorporate Adjustment Layers like Color Lookup into your work to really help set the mood and tone of your paintings.Annabelle 2 is set to release in theaters in 2017. Will you be going to see it? Let me know in the comments. And check out these other spooky tutorials:
- Create a Hauntingly Beautiful Mummy in Adobe Photoshop
- Create a Digital Painting of a Zombie From Scratch in Adobe Photoshop
- Create Your Own Terrifying Monster Rabbit in Adobe Illustrator