Tiled backgrounds are great for both website backgrounds and in all kinds of Photoshop work. They are particularly useful when working with textures where you need a larger overall background than the small image you have to work with. In this quick tutorial I'll take you through taking a texture and turning it into a background image ready for seamless tiling. It's a useful little technique that's been around forever. We need this technique for today's other tutorial - How a Simple Layout Can Be Mixed 'n' Matched with Patterns, Photos and Backgrounds.
Why you can't just tile any old photo

So in this tutorial we want to create a tiled background of a grass texture. There's a fantastic photo of grass on Flickr by 100kr
which we can use. However if we just tile the image as is, the result isn't very good. As you can see above it's very clear where the image is being repeated and the dark patches look pretty weird. So to turn that photo into a tiled background we need to first remove any irregularities, and then make the edges blend in to each other.
Step 1

So the first step is to grab the main image and then crop into a section that doesn't have the really dark corner patches. Something like the box shown above.
Step 2

Here is our segment. I've actually shrunk it down a bit so that the texture isn't so oversharpened. Now although it's mostly evenly coloured, we could do with lightening the edges. The more even we can get the image the better as slight differences are quite glaring when the background is tiled.
So just grab the Dodge Tool (O) and with a large soft brush, just gently brush over the left and right edges to lighten them up a shade. Don't go overboard though as the grass will look washed out.
Step 3

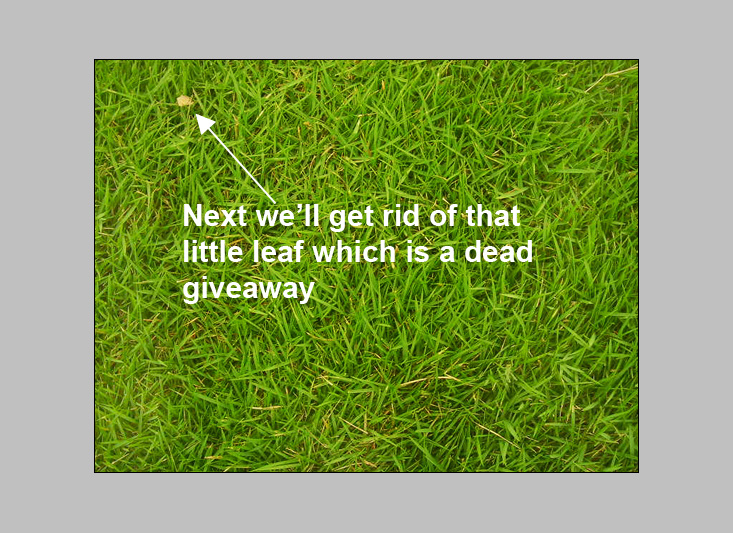
As you can see above the grass is looking a lot more uniformly coloured. But there is a little leaf in the top left, that is going to be a dead giveaway if the same leaf appears over and over again, so we should get rid of it. To do this grab the Patch Tool (J) and draw a shape around the leaf then drag with your mouse to get an area nearby to patch it with. (Note that the Patch tool should be set to Source and not Destination, otherwise you use it slightly differently)
Step 4

So our background is looking pretty nice and uniform now. We just need to make the edges bleed into each other. So duplicate the grass layer. Then move the first layer to the left and the second layer to the right. Keep doing this until you can see both layers with a white gap in between. Now bring them together so the right most edge of the first layer touches the left most edge of the second layer.
Step 5

Here you can see the two layers almost touching. Bring them together so there isn't any white in between and merge the two layers into one.
Step 6

Now we again use the patch tool to draw a rough shape around the edge where the two layers meet, then use your mouse to drag a nearby area over to patch it up.
Step 7

The patch tool makes this sort of operation really easy, especially with a background as noisy as this grass. As you can see unless you look really carefully it's not apparent where the blend line is. If you wanted to you could go into fine detail and clone individual blades of grass - but this is fine for our purposes.
Step 8

Now we repeat the same process vertically. So duplicate the layer and move one down and one up until the bottom and top edges meet. Merge the layer together and use the patch tool to get rid of the edge.
Step 9

And now we are ready for tiling!
The reason this will work is we've effectively gotten rid of those edges, the new edges of the document already match up because we moved the layers equally left and right so that the right edge of this document actually is the next pixel along from the left edge.
Step 10

So press CTRL-A to select everything and go to Edit > Define Pattern.
Step 11

Now we give the pattern a name
Step 12

Now on any layer if you select blending options and tick the Pattern Overlay box you can choose from your set of custom patterns as shown, including the grass one we just made. In the image above you can see me applying the pattern into a website background.
Of course you should also save the pattern image as a PSD or JPG itself as you may need it as a standalone image. For example if you were to use it as a background image in an HTML document you'd need the single JPG image, not a Photoshop "Pattern".
Finito!

Here's our tiled grass. As you can see there is a bit of a dark patch that gives it away, but because I'm going to be using this as a background to a website it's not a big deal as there will be stuff over the top. Nonetheless you could easily go back and patch up that spot to make it more seamless.
Update - Filter > Other > Offset
Thanks to the commenters who pointed out that there is in fact a simpler way to offset the background using a filter! Just go to Filter > Other > Offset and select a pixel amount to move the image by both horizontally and vertically. Thanks for the tip guys! I learn something new everyday :-)
