
This time we'll create a simple vexel image from a picture. Also, we'll use some pattern effects to give the image some interesting texture. This is a basic way to create a vexel image using predominately Photoshop's vector based tools. After completing this tutorial, you'll become a master of the Pen Tool.
Final Image Preview
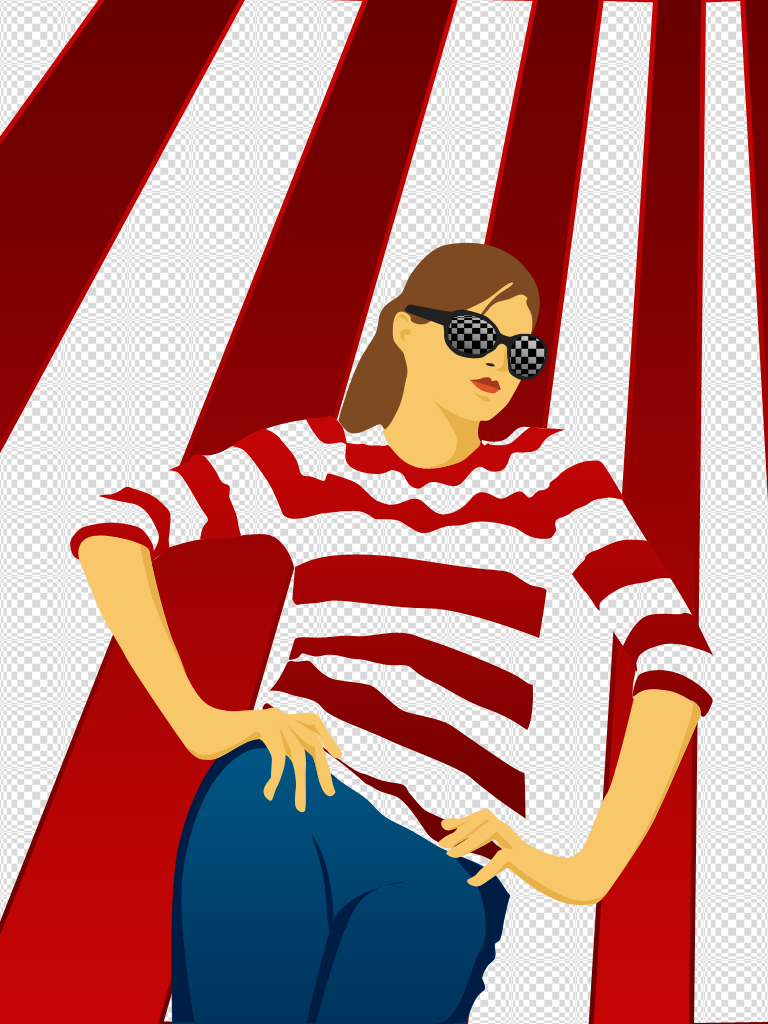
Before we get started, let's take a look at the image we'll be creating. Click the screenshot below to view the full-size image. As always, the layered Photoshop file is available via our Psdtuts+ Plus membership.
Step 1
Get started by creating a new document 768px by 1024px and paste this image in. Delete the background layer. Then add a new white Solid Color Fill Layer.

Step 2
Now the few things you'll need is the Pen Tool and a lot of patience. Select the Pen Tool, and set this Foreground Color as #FFE400. This is not really important because you'll change the colors later. Create some points over the yellow stripes. After you have created a shape, select Add To Shape Area in the Pen options. Then continue drawing. This way you'll get a complex shape in one layer. Name this layer "BGLines."
Hide the picture layer for a moment. You'll get something like image 3 below. Finally, put the picture layer above the "BGLines" layer, and show it. Remember this step, because you must put the picture layer above the others as many times as you need.

Step 3
Now use a white foreground, and draw the shirt contour. Create a new layer named "Shirt." Don't worry about the green stripes right now. Once you have finish all the shirt shape, hide the picture layer. View the result. Then put the "Shirt" layer above the "BGLines," and remember to put the "picture" layer above all the other layers every time you draw a shape.

Step 4
Draw the arms and the hands. I draw each one on a different layer, but you can draw both arms in a single layer. Maybe the most difficult object to draw is the human hand. Check the fingernails; I used almost a 90º curved angle there. Finally place the "hands" and "arms" layers above the "Shirt" layer.

Step 5
Draw the pants shape, use a blue foreground color (#002352). Place the "Jeans" layer above the "BGLines" layer.

Step 6
Using the same foreground color as the hands, draw the face and head shape. Place the "Head" layer below the "Shirt" layer.

Step 7
Now draw the brunette hair (#7e4a22). Then place the new "Hair" layer above the "Head"layer.

Step 8
Now, for the sun glasses use a dark gray foreground color (#212121). Put the "Sunglasses" layer above both the "Head" and the "Hair" layers.

Step 9
At this point, we get the basic shape of the girl. Now it's time to add some details. First, add the green stripes. It's not difficult, and should take only about ten to fifteen minutes. Remember to select Add to Shape Area in the Pen Options. Then set a green foreground (#03b72d). Place the "Shirt lines" layer above the "Shirt" layer.

Step 10
Draw the lips (#E05328) and the upper lip (#A33B1E). Also, draw a little black nose hole. Put these three layers above the "Head" layer.

Step 11
Now we'll add the final details. Set the "picture" layer Opacity to 50%. This will give it a better look than the previous drawn shapes. Add the sunglasses crystal using a gray color (#404040), place the "Sunglasses Crystal" layer above the "Sunglasses" layer.

Step 12
This is an important step, we'll add some vector shadows to the skin to create a lightening illusion. For this there's no shape to follow. You must use your common sense. A good way to do it is looking at the dark areas of the skin create a similar shape. Be sure to always use the Pen Tool for this. I used a dark orange color (#d29115). Place the "Skin Shadows" layer above the "Hands" layers.

Step 13
Draw some shadow shapes using a dark blue foreground. Then place the "Jeans shadow" layer above the "Jeans" layer.

Step 14
At this point you have a basic vexel of the girl's picture, you can add more details if you want to.

Step 15
Now you can customize the shapes using your imagination, I'll begin changing the colors as follows: Skin (#F8C769), Skin Shadow (#E7B148), Shirt stripes (#C50505), Background (#C50505), and Background stripes (#FFFFFF).

Step 16
Create a new Group of layers, name them "Girl." Add all the layers to the group except "BGLines" and "BG." Select the group and resize it.

Step 17
Select the "Sunglasses Crystal" layer. Then add a Gradient Overlay (#3D3D3D to #858585). First add Linear Light Overlay then a Pattern Overlay. I used the "Optical Checkerboard" pattern. Ensure that Link with Layer option is selected. Drag the pattern a little to get the result shown below.

Step 18
Select the "Jeans" layer. Then add a Gradient Overlay (#00345E - #025B87).

Step 19
Select the "BG" layer. Then add a Gradient Overlay that goes from red to dark red (#C70704 - #6A0000)..

Step 20
Add the same Overlay to the "Shirt lines" layer, but reverse the colors this time (#6A0000 - #C70704 ).

Step 21
Now select the "BGLines" layer, and add a Gradient Stroke style using these values.

Step 22
In "BGLines" layer add a Pattern Overlay using the same pattern as the sunglasses, but this time deselect the Link with layer option. Then click on Snap to Origin, this way you are fixing the pattern to the origin of the document.

Step 23
Add the same pattern style to the "Shirt" layer. Remember to deselect the Link to Layer option. As you can see below, it looks like only one layer style.

Conclusion
This technique is one of the most flexible, as a vector graphic can be resized without losing any quality. This can help you in printing your designs as well. Remember that your imagination is the only limit. Try vexeling other pictures and playing with the styles, or for Plus Members download the .PSD file, and add more details.
