The healing brush and clone tool are fine for fixing blemishes or
removing certain things in an open area, but get near a hard edge and
these tools become less useful. To realistically remove a large object,
it takes careful attention to detail, its just
The Healing Brush and Clone tools are fine for fixing blemishes
or removing certain things in an open area, but get near a hard edge and
these tools become less useful. Realistically removing a large object
takes careful attention to detail, and it's just something Photoshop
can't quite automate.
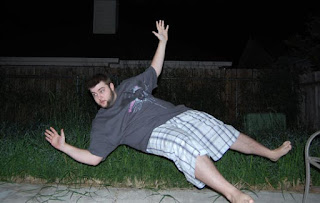
Here is the finished "Matrix" effect:

And here is the starting photo, a really simple timer-shot of me leaning on a chair:

If you can get past my overgrown grass and goofy look, there is a really awesome effect to be learned here.
Step 1

Open the file in Photoshop. Copy the Background layer by dragging it
down to the New Layer icon in the bottom of the Layers Palette, then
hide the original layer by clicking the small eye icon next to it. Now
we need to get in really close to take the chair out with precision. In
the Navigator window, zoom in to 500% (note: All through this tutorial,
my zoom level changes, depending on what I'm trying to show you. 500%
isn't required, just work at a zoom level you feel comfortable with).
Select the Eraser tool and make sure it's set to Brush.
Step 2

Making sure you have the copied layer selected, just erase the chair
out. I know it looks ugly, but we will fix it as we go. Just use the
eraser brush and get out all the chair you can. After you've done that,
unhide the Background layer.
Step 3

Now we will try to cover up the chair with grass from other areas of
the photo. With the background layer selected, use the Polygonal Lasso
Tool, and make a selection about the size of the first chair leg. Press
Ctrl+C to copy the selection, then Ctrl+V to paste it into a new layer,
which should be between the first two. Move the layer to the right until
it covers up the chair leg, which now exists only on the bottom layer.
When you've got the grass strip in place, press Ctrl+E to merge it with
the Background layer.
Step 4

We've got one chair leg gone, so just repeat the steps we used there.
First, make a selection on the Background layer, then copy and paste
the selection to a new layer. Move the new layer into place over the
piece of the chair, then hit Ctrl+E to merge it back into the Background
layer. Keep doing this until you get rid of the chair completely. If
you need grass, copy grass. If you need concrete, copy concrete.
Step 5

Zoom out and see what you've got. You can already see the effect, but
there are some small areas that could use some extra attention.
Step :

Here are some things we need to fix:
A: You can still see little bits of the chair. You can see a hint of
the chair's tan color in a couple places down the side of the body. This
is an easy fix. Zoom way in, to 700%, and just carefully erase them off
of the top layer.
B: When cutting out the chair, we ruined the shadow in the photo, but we can fix this by making our own.
C: You can see some minor repeats in the grass, which makes it look
less natural. Getting rid of them will complete the illusion.
Step 7

Make a new layer and use the Polygonal Lasso Tool to select an area
around the missing shadow segment. Select a little bit more than you
need to, it'll make it easier to blend in your new shadow. Make sure to
try to follow the contour of the object you are selecting.
Step 8

Click Edit > Stroke to give us a black line. I used these
settings. Once its stroked, use the Polygonal Lasso Tool to clip on the
right, left, and bottom sides. Just select them and hit Delete, leaving
only the top line.
Step 9

Now we can blur the shadow to match with Filter > Blur >
Gaussian Blur. You don't need much—just enough to soften the edge. Now
move the layer between the other two photo layers. If you need to, move
the shadow layer into better position (I had to move mine down and to
the right a tiny bit).
Step 10

Now we can fix the areas where you can see repeats in the grass. Hide
the top two layers, and just use the Healing Brush to fix these small
bits. The Healing Brush works best with large areas to sample from. When
the chair was in place, the Healing Brush wouldn't have been enough to
get the job done, but now that we've done so much work by hand, getting
rid of these small edges is easy.
