This text effect was inspired by the many Layer Styles available on Envato Market.
Tutorial Assets
The following assets were used during the production of this tutorial.- Bebas Neue Bold font
- AsphaltDamaged0043 Image 1 - Small (1024x768)
- Bus Seats
- Free Pack 6000 photoshop gradients by Supertuts007 (Load the CHROMES.grd file)
1. Define the Pattern
Step 1
Open the Bus Seats image, and then go to Filter > Distort > ZigZag. Change the Amount to 20, the Ridges to 5, and the Style to Pond Ripple.
Step 2
Go to Edit > Define Pattern, and type Reflection Pattern in the Name field.
2. Create the Background
Step 1
Create a new 950 x 650 px document, place the AsphaltDamaged0043 texture on top of the Background layer, and resize it as needed.
Step 2
Double-click the texture's layer to apply a Gradient Overlay effect with these settings:- Blend Mode: Multiply
- Style: Radial
- Scale: 150%
- Click the Gradient box to create the gradient fill using the colors
#757575to the right and#0f0f0fto the left.


3. Create the Text Layers
Step 1
Create the text using the font Bebas Neue Bold and set the Size to 220 pt and the Kerning to Optical.
Step 2
Duplicate the text layer, and change the copy's Fill value to 0.
4. Style the Original Text Layer
Double-click the original text layer to apply the following layer style:Step 1
Add a Bevel and Emboss with these settings:- Size: 1
- Uncheck the Use Global Light box
- Angle: 30
- Altitude: 16
- Check the Anti-aliased box
- Highlight Mode - Opacity: 100%
- Shadow Mode - Opacity: 100%

Step 2
Add a Contour with these settings:- Contour: Cove - Shallow
- Check the Anti-aliased box
- Range: 100%

Step 3
Add a Stroke with these settings:- Size: 1
- Position: Inside
- Fill Type: Gradient
- Use the stainless steel xx gradient fill

Step 4
Add an Inner Shadow with these settings:- Opacity: 35%
- Uncheck the Use Global Light box
- Angle: -115
- Distance: 3
- Size: 7

Step 5
Add an Inner Glow with these settings:- Blend Mode: Vivid Light
- Opacity: 100%
- Color:
#f4f2e7 - Choke: 0
- Size: 3

Step 6
Add a Gradient Overlay with these settings:- Check the Dither box
- Blend Mode: Color
- Opacity: 90%
- Check the Reverse box
- Use the stove pipe 70 gradient fill

Step 7
Add a Pattern Overlay with these settings:- Pattern: Reflection Pattern
- Scale: 50%

Step 8
Add an Outer Glow with these settings:- Blend Mode: Multiply
- Opacity: 35%
- Color:
#404040 - Size: 21

Step 9
Add a Drop Shadow with these settings:- Opacity: 100%
- Distance: 5
- Spread: 10
- Size: 10

Step 10
Add another Drop Shadow with these settings:- Opacity: 80%
- Uncheck the Use Global Light box
- Angle: 132
- Distance: 17
- Size: 38

Step 11
You can go back to the Pattern Overlay effect, and then click-drag the pattern inside the text to move it around until you get a result you like.

5. Style the Copy Text Layer
Double-click the copy text layer to apply the following layer style:Step 1
Add an Inner Glow with these settings:- Blend Mode: Linear Light
- Opacity: 20%
- Color:
#e1e1e1 - Technique: Precise
- Size: 5
- Contour: Cove - Deep

Step 2
Add a Gradient Overlay with these settings:- Blend Mode: Soft Light
- Angle: 80
- Use the steel pipe 10 gradient fill

Step 3
Add an Outer Glow with these settings:- Blend Mode: Color Dodge
- Opacity: 50%
- Color:
#ececec - Size: 21


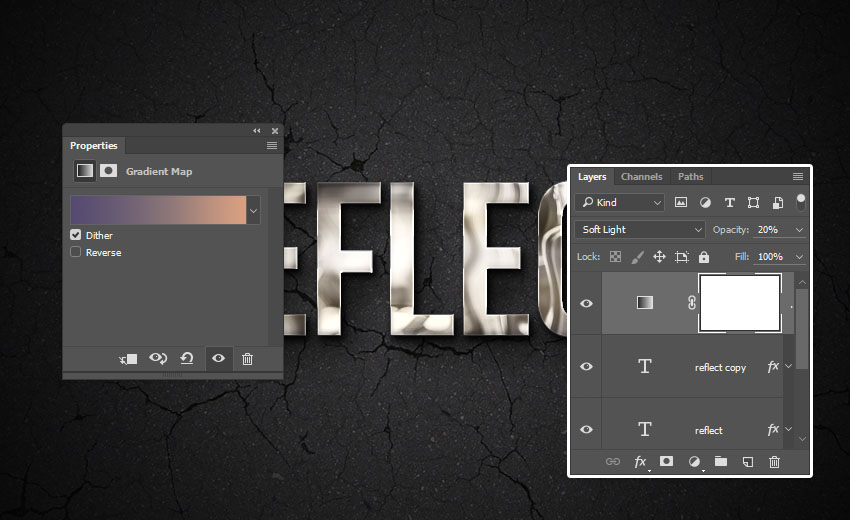
6. Add an Adjustment Layer
Step 1
Click the Create new fill or adjustment layer icon at the bottom of the Layers panel, and choose Gradient Map.
Step 2
Check the Dither box, and then create the gradient fill using the colors#554b70 to the left, #857177 in the middle, and #d8a082 to the right.Change the adjustment layer's Blend Mode to Soft Light and its Opacity to 20%.

Congratulations, You're Done!
In this tutorial, we applied a filter to an image and defined it as a pattern. Then, we created a simple background using a texture and a gradient overlay effect.After that, we created two text layers and styled them to create the text effect. Finally, we finished things off by adding a color adjustment layer.
Please feel free to leave your comments, suggestions, and outcomes below.
